DETERMINATION OF LIQUID LIMIT OF SOIL
DETERMINATION OF LIQUID LIMIT OF SOIL
The moisture content at which the cohesive soil passes from a liquid state into a plastic state is called the liquid limit of the soil. Similarly, the moisture contents at which the soil changes its behavior from a plastic to a semisolid state is called as the plastic limit of soil.
Objective
This test is done to find out the liquid limit of soil as per IS: 2720 (Part 5) – 1985. The liquid limit of fine-grained soil is the water content at which soil behaves practically just like a liquid, but have small shear strength. It’s flow closes the groove of 12.7 mm in just 25 blows in Casagrande’s liquid limit device.
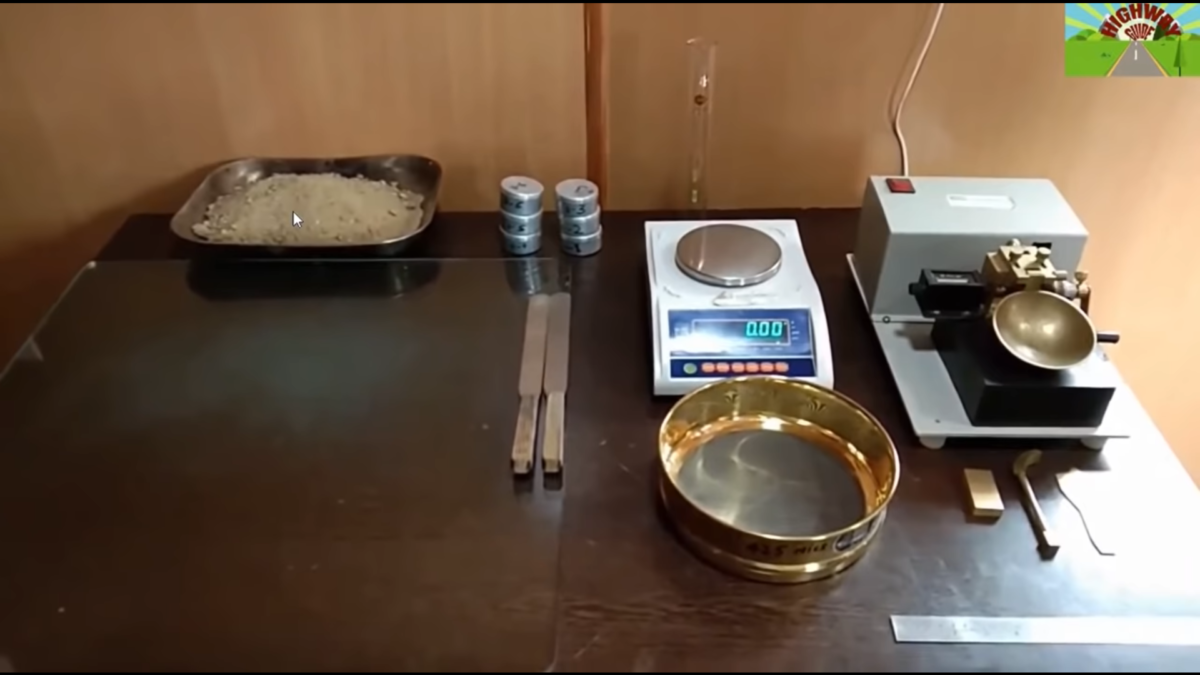
Apparatus
The apparatus used :-
i) Casagrande’s liquid limit device
ii) Grooving tools both standard and ASTM types
iii) Oven
iv) Evaporating dish
v) Spatula
vi) IS Sieve of size 425µm
vii) Weighing balance, with 0.01 /1 gm accuracy
viii) Wash bottle
ix) Air-tight container for determination of moisture content
Preparation Of Sample
i) Dry the soil sample in and break the clods with wooden hammer. Remove any organic matter like tree roots& pieces of bark, etc.
ii) Take about 120 g of the specimen passing through 425µm IS Sieve and mixed thoroughly it with distilled water in the evaporating dish and left it for 24 hrs. for soaking.
Procedure
i) Place a portion of the paste into the cup of the liquid limit device.
ii) Level the mix from top so as to have a maximum depth of 1 cm.
iii) Draw the groove from special design tool through the sample along the symmetrical axis of the cup & holding the tool perpendicular to the cup.
iv) For the normal fine grained soil: The Casagrande’s tool is used to cut a groove of 2 mm wide at the bottom, 11 mm wide at the top and 8 mm deep.
v) For sandy soil: The ASTM tool is used to cut a groove of 2 mm wide at the bottom, 13.6 mm wide at the top and 10 mm deep.
vi) After the soil paste has been cut by a suitable grooving tool, the handle of the device is rotated at the rate of about 2 revolutions per second and the no. of blows counted, till the two parts of the sample come into contact for about 10 mm length.
vii) Take about 10 g of soil near the closed groove as a sample for determing its water content.
viii) The soil of the cup is transferred into the dish containing the soil paste and mixed thoroughly after adding some water. Repeat the test as earlier.
ix) By changing the water content of the soil and repeating the foregoing operations & obtain at least 5 readings in the range of between 15 to 35 blows. Keep in mind don’t mix dry soil to change its consistency.
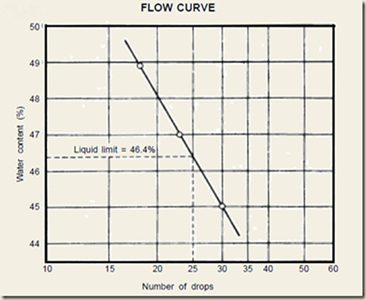
x) Now Liquid limit is determined by plotting a ‘flow curve’ on a semi-log graph, with no. of blows as abscissa X -axis (log scale) and the water content as ordinate on Y axis and drawing the best possible straight line through the plotted points.
Reporting Of Results
Report the water content corresponding to 25 number blows by reading from the flow Curve as the Liquid Limit. A sample of Flow curve is given below for your reference.
Safety: .1 Use hand gloves while opening the door of oven
DETERMINATION OF PLASTIC LIMIT
Objective
For determination of the plastic limit of soil.
Reference Standard
IS : 2720(Part 5)-1985 Determination of Plastic limit.
Equipment & Apparatus
- Oven
- Balance with 0.01 g accuracy
- IS Sieve of 425 micron
- Flat surface glass for rolling
Preparation Of Sample
After receiving the soil sample from the site it is dried in air or in oven ( by maintaining a temperature of 600C). If clods are there in the soil sample it is broken with the help of wooden mallet. The soil passing through 425 micron sieve is used for this test.
Procedure
- Take 20 gm soil sample passing from 425 micron IS sieve .
- It is then mixed with distilled water thoroughly in the evaporating dish till the soil mass becomes plastic enough to be easily molded with the fingers itself.
- Soil should be allowed to season for sufficient time for allowing water to permeate throughout the soil mass.
- The 10 gms. of the sample is taken and rolled between fingers and glass plate with just sufficient pressure to roll the mass into a thread of uniform diameter throughout its length. The rate of rolling shall be kept between 60 and 90 stokes per minute.
- Continued the rolling till the thread becomes 3 mm. in diameter and see the crumbling.
- If not soil is then kneaded together to a uniform mass and rolled again.
- The process is to be continued until the thread crumbled and offering shear when rolled into 3 mm diameter.
- The pieces of the crumbled thread are collected in a air tight container for determination of moisture content .For more practical see the video given below:
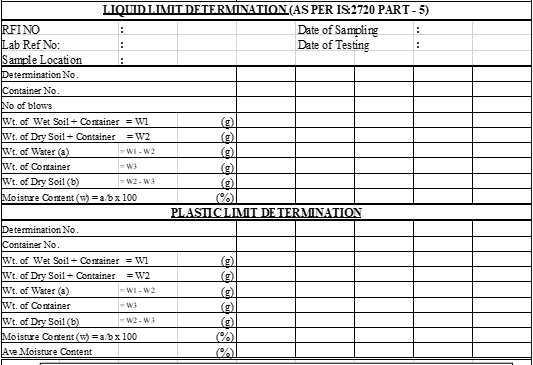
Report
Sample Format